Guide To Form DS-160

If you’re planning to visit the United States or if your parents are visiting you in the United States, applying for a visa is the first step in visiting the United States.
One of the most important parts of the visa application process is filling out the DS-160 form.
In this blog, we’ll guide you on what a DS-160 is, why it’s important, and how to fill it out correctly so that you can obtain the US visa type you’re seeking, successfully.
What Is A DS-160?
The DS-160 which is called the Online Nonimmigrant Visa Application Form is an online form, used for applying for a temporary visa to enter the United States.
Reason for travel such as for visiting, business, education, medical treatment, or other purposes that don’t involve moving to the US permanently.
Through the form, the US Department of State collects information from individuals who are applying for nonimmigrant visas.

When Is DS-160 Form Required?
DS-160 is required at the time of applying for a nonimmigrant visa to enter the U.S. The DS-160 family application is required when multiple family members, such as spouses and children, are applying together for U.S. non-immigrant visas, such as tourist (B-2) or work-related visas.
The form is used for all nonimmigrant visa categories, including:
- B-1/B-2 (business/tourist)
- F (international student visa)
- J (exchange visitor program)
- H (temporary workers)
- L (intracompany transferee), and
- K (fiancé(e)) visas.
Note: Mexican citizens applying for a TN visa are required to complete and submit Form DS-160. Canadian citizens who are applying for a TN visa are not required to file the DS-160.
The form must be completed and submitted online through the U.S. Department of State’s Consular Electronic Application Center (CEAC) before scheduling your interview at a U.S. embassy or consulate.
Note: Each applicant, including children, must have their own form DS-160 visa application. The form DS-16o must be applied online. The U.S. Embassy or Consulate does not accept handwritten or typed applications. Additionally, the barcode number on the Form DS-160 confirmation page is required to book your visa appointment. You will not be allowed to attend your visa interview without the confirmation page.
Make sure a new DS-160, Online Nonimmigrant Visa Application form, and associated barcode is submitted with every new visa application.
Why Is The DS-160 Important?
The DS-160 is a critical part of the visa application process because it helps the US government determine whether you’re eligible for a visa.
The DS-160 collects information about your personal and travel details, as well as background information such as employment history and criminal records.
Consular Officers use the information entered on the DS-160 to process the visa application and, combined with a personal interview, determine an applicant’s eligibility for a nonimmigrant visa.
When you electronically sign your DS-160, you are certifying that all the information contained in it is true and correct. Misrepresenting any facts could make you ineligible to enter the United States.
Double Recheck all your answers are accurate and that every question is answered completely.
If you don’t fill out the DS-160 correctly, your visa application may be denied, and you may not be able to enter the United States. Take your time to complete the DS 160 form accurately and thoroughly.
Where To Access DS-160 Form?
You can access the form DS-160 online on the U.S. Department of State’s Consular Electronic Application Center (CEAC) website. It must be filled in and filed online.
Here are the steps to access the DS-160 form:
- Go to the CEAC website.
- Select the location where you will be applying for the visa from the drop-down menu under “Select a Location.”
- Click on the “Start an Application” button.
- Select “Nonimmigrant Visa Application (DS-160)” from the list of options.
- Follow the instructions on the website to complete and submit the DS-160 form.
Internet Browser requirements for filling out DS-160: DS-160 online application is best supported by Internet Explorer 11 or higher and Google Chrome 58 or higher. Safari is not supported.
Sample Form DS-160
You can access a free sample form to help you while filling out the form.
Update On Nonimmigrant Visa Fees
Completing the DS-160 form is free of charge, but you have to pay the fees for the specific type of visa that you are seeking.
Starting from May 30, 2023, the U.S. government has announced an increase in the application fees. If you intend to apply for a travel visa, student visa, or exchange visa, you will be required to pay 15% more than the previous amount.
Specifically, the application fee for these non-petition-based visas (excluding the E category) will increase from $160 to $185. Additionally, a few other nonimmigrant visa categories will also have a slight increase in the fee.
Documents Required To Fill Out Form DS-160
To fill out Form DS-160, you will need the following documents:
- A valid passport
- Travel itinerary
- National ID number (issued by your home country)
- Social Security Number/U.S. Taxpayer ID (if applicable)
- U.S. contact or sponsor information
- Work or education history
- Travel history (to the US or countries visited)
- Dates of your last five visits or trips to the United States, if applicable
- Information about your immediate family & travel companions
- Digital copy of a recent photograph that meets US government guidelines
If you are an international student who plans to study in the US, you’ll need to provide your SEVIS ID (found on your I-20 or DS-2019), and the address of the school you’ll be attending. If you’re a temporary worker, you’ll need to have a copy of your I-129 ready.
How To fill Out The DS-160?
Filling out the DS-160 is a straightforward process, but it can take some time, especially if you’re unfamiliar with the questions.
It takes approximately 90 minutes to fill out the form in one sitting. While working on Form DS-160, you have the option to save your progress and return it within 30 days.
Additionally, you can save the form to your computer and upload it later.
If you’re filling out multiple forms for your family, you can use the family application option that automatically fills in some details for each member.
To use this feature, complete one DS-160 and select the option to create a family application on the “Thank You” page. However, each family member still needs to complete their own individual DS-160 form.
Here Are The Steps For Filling Out Form DS-160
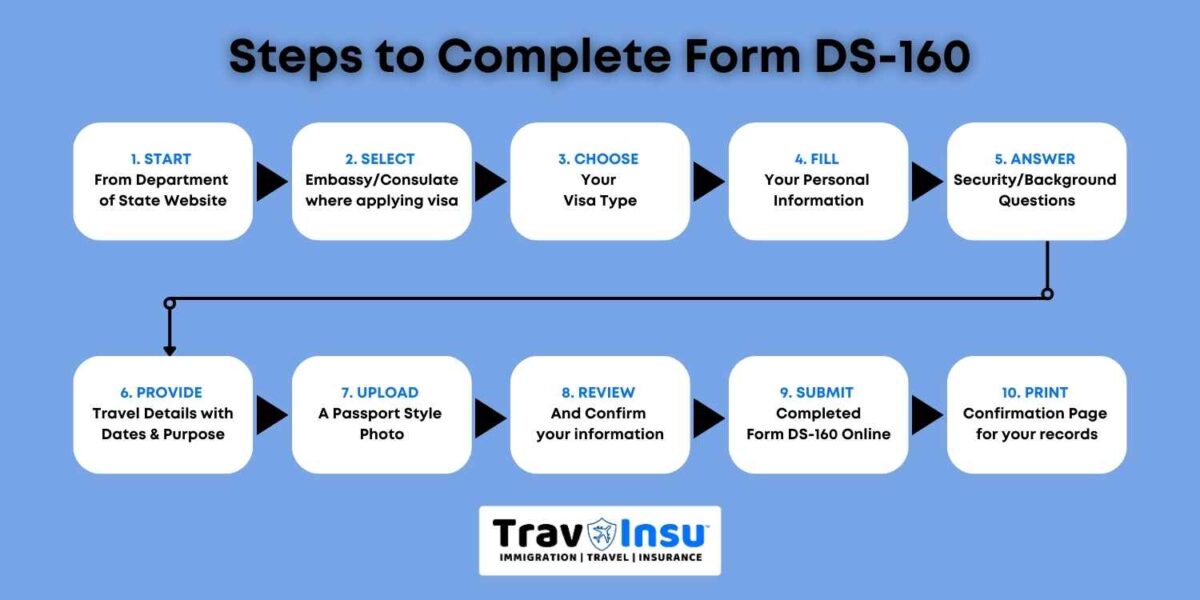
Visit The Website
The first step is to visit the US Department of State’s website and find the DS-160 form. You’ll need to create an account and log in to start the application process.
Start The Application
Once you’re logged in, you’ll need to start the application. To fill out Form DS-160, you’ll be asked to select the US embassy or consulate where you’ll be applying for the visa.
Note: Even if you travel unexpectedly while your application is pending, you’ll be able to schedule your visa interview at a local embassy or consulate most convenient, even if it’s in a location other than the one you first chose.
On the next page, you will see your Application ID. You will also be asked to provide the answer to a security question. Write these down and keep them safe: together, they will let you access your application again later.
You can also find your Application ID displayed on the top right-hand corner of each page of the DS-160. If you forget your Application ID, you can retrieve it online using your security question.
Remember that your saved Form DS-160 will only remain available for 30 days. If you need more time, you can download it to your computer and upload it again later.
Fill Out The form
The DS-160 is a lengthy form, and you’ll need to provide a lot of information about yourself, your travel plans, your background, work, education history, and family information. Understanding the sections of the DS-160 form is essential to fill it out accurately and efficiently.
Let’s go through the form, section by section:
Personal information
The section collects your basic details such as full name, address, date of birth, marital status, nationality, passport information, and social security or taxpayer ID number.
Travel itinerary
This section requires you to provide your travel plans, including the purpose of your trip, arrival and departure dates, and accommodation details. Mention tentative dates if you don’t have specific dates.
Travel Companions
You can also need to list your travel companions. This may be family, friends, or members of an organized tour group.
Previous Travel to the U.S.
This part of the form asks for your travel history to the United States and if you’ve ever been denied a U.S. Visa or filed an immigrant petition with U.S. Citizenship and Immigration Services (USCIS).
Contact Information
Here, you’ll provide your current address, phone number, and email address, and list all social media accounts like Facebook, Twitter used in the past five years. USCIS officials are required to check your activity on these accounts while reviewing your application.
Passport Information
This section is easy. Provide your passport information including your passport number and expiration date. You may need to fill in a ‘Passport Book Number’, which is also called an ‘inventory control number’. Not all passports have this number. If it doesn’t apply to you, check “Does Not Apply”.
Point of Contact in the US
Here In this section, you need to fill details of a person in the US who can verify your identity. If you do not know anyone in the US, Then you can put the name of the business or organization, you intend to visit on your trip.
Family Information
Here, you will provide basic details about your immediate family members, including your parents, spouse, children, or any other family members currently in the US.
If you are inviting your family to visit you in the USA then visitor insurance for parents visiting the USA related information will be useful.
Employment History, Education, Training Information
Fill in the details about your educational background, and employment history going back up to 5 years.
You will also be asked for details about any special skills you possess, or any military groups, charities, or professional organizations of which you have been a member. You will be asked to provide your current employer’s name and address, as well as your job title and salary.
Security and Background Information
In this section, you will answer security questions and your background.
Questions will be based on your criminal history, drug use, and other security-related issues. You must disclose if you have ever been arrested, convicted, or charged with a crime, regardless of whether you were found guilty or not.
You must also provide details about any previous visa denials, travel restrictions, or deportations.
Ensure you read these questions carefully and take care when answering, as mistakes here could adversely affect your application.
Photo Upload Section
You must upload a recent passport-sized photograph that conforms to U.S. Department of State guidelines. Once uploaded, adjust the size of the photo and crop the image to make sure it fits the requirements.
Make sure to bring additional printed photographs to your visa interview.
REVIEW, CONFIRM LOCATION, SIGN, AND SUBMIT
Once you’ve completed all the questions, you’ll be asked to review the entire form carefully to ensure all the information is correct. You’ll need to confirm the location from which you are applying so that your application can be sent to the appropriate U.S. embassy or consulate.
Once you’re done and read the terms and conditions, you can submit your application electronically.
You’ll then click ‘next’ to access your official confirmation page. Print the confirmation page and keep it safe. This page contains a unique barcode and a confirmation number that is required for your visa interview and to track the status of your visa application.
You will need to present it to consular officials at the time of your visa interview.
If you forget to print your confirmation page when you first filled out DS-160, you can log in again using your Application ID and security question to print it out.
Things To Keep In Mind While Filling Form DS-160
It’s essential to fill out the form accurately and truthfully to avoid any delays in processing or visa denial. Here are some common mistakes to avoid while filling out the form:
- Provide accurate information, like name, date of birth, passport number & contact information
- Any errors in information could lead to a delay in processing or visa denial
- Answer all questions truthfully, even if you think it might harm your chances of obtaining a visa
- Upload a recent, passport-sized photograph that meets the specific requirements
- The photo is in color, taken against a white background, and shows your full face
- Once you have submitted your form, make sure to save the application ID number
- An application ID number is necessary to access the form, make any changes, or check the status
- Fill out all sections of the form, even if the question seems irrelevant to you
- Leaving any section of the form blank could lead to a delay in processing or a visa denial
- Do not rush through the form, avoid mistakes, & take your time to fill it out accurately
Frequently Asked Questions
How Long Does It Take to Fill Out the DS-160 Form?
The time it takes to fill out the DS-160 form can vary depending on various factors such as your familiarity with the questions and your internet speed. On average, it may take about 1-2 hours to complete the form.
Do remember that you can save Form DS-160 while in progress and resume it within 30 days. You can download and store the form on your computer, then upload it at a later time.
Can I Make Changes to the DS-160 Form After Submission?
You cannot make changes to the form once you have submitted it. However, if you have not yet submitted it, you can go back and make changes to it as many times as necessary before submitting it.
What is the Processing Time for DS-160 Form?
The processing time can vary depending on various factors such as the workload of the U.S. embassy or consulate where you are applying, the visa category you are applying for, and the completeness of your application. Generally, the processing time is several weeks, but it may take longer during peak travel seasons or due to unforeseen circumstances.
What Happens After Submitting DS-160 Form?
After submitting the form, you will need to schedule an interview at the U.S. embassy or consulate where you will be applying for your visa. You will also need to pay the visa application fee and any other applicable fees.
At your interview, a consular officer will review your application and determine whether you qualify for the visa you are applying for. If approved, you will receive your visa within a few days to a few weeks, depending on the embassy or consulate’s procedures.
How do I sign DS-160?
You have to electronically sign it by clicking the “Sign Application” button at the bottom of the form. Failure to click the “sign application” button once you are done may result in the denial of your visa application.
Conclusion
The DS-160 form is an important part of the visa application process for nonimmigrant visas to the U.S. Fill the form accurately and honestly. Any errors or wrong information could result in delays or even denials of your visa application.
Make sure you have a strong internet connection and ample time before you begin. Do not rush and pay careful attention while answering the questions.
We recommend that you review the completed form carefully before submitting it, and do not forget to keep a copy of the confirmation page.
With the right preparation and attention to detail, you can navigate the DS-160 form with confidence and improve your chances of getting the necessary visa for your visit to the U.S.